Managing attendees and panelists in a webinar
You can have both panelists and attendees in your webinar and manage them as host during the session. By clicking Participants in your host controls, you can manage the panelists and attendees in your webinar. This includes promoting a panelist to co-host or attendee to panelist, demoting panelists to attendee, unmuting, stopping video, and more.
You can view reporting after your webinar concludes, to see registration, attendee, polling, and other details.
For managing panelists before the webinar session, you have the option to manually add or remove them as a host.
This article covers:
Prerequisites managing attendees and panelists in a webinar
- Zoom Webinars add-on
- Host privilege for this webinar
How to access the Participants panel
- Sign in to the Zoom desktop client.
- Start a webinar as the host.
- Click on Participants
 in the webinar controls.
The Participants panel will be on right side of your screen. The host, co-hosts, and panelists will be listed in the Panelist tab and the attendees will be listed the Attendees tab.

Note: Participants are displayed in the following order.
- Participants allowed to talk.
- Participants with their hand raised. Participants that raised their hand first are displayed at the top.
- Participants without their hand raised.
How to manage panelists
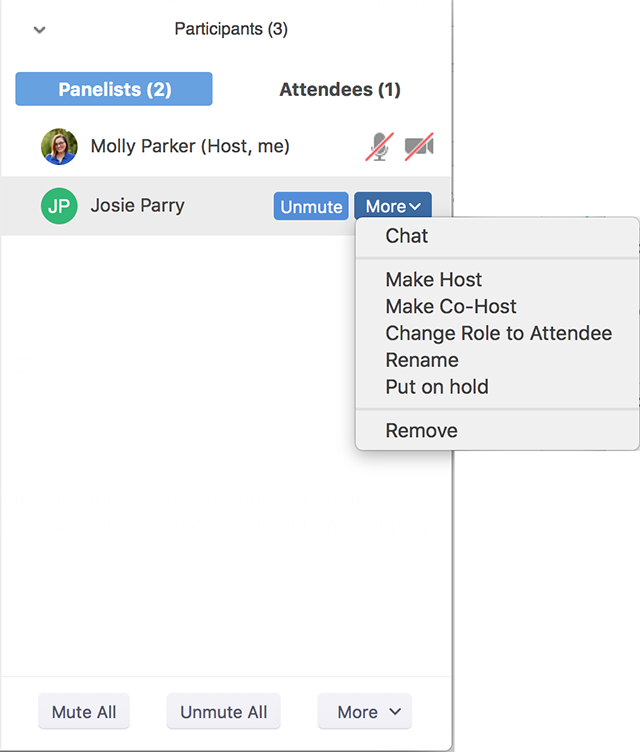
Hover over over the panelist's name and click More. You will see the following options to manage participants:

-
Mute / Ask to Unmute: Mute or unmute the panelist. They need to accept the unmute prompt before they are unmuted.
-
Chat: Open the chat window to send messages directly to the panelist.
-
Make Host: Assign the panelist to be the host. There can only be one host.
-
Make Co-Host / Withdraw Co-host permission: Assign the panelist to be a co-host. You can have an unlimited number of co-hosts.
-
Change Role to Attendee: Click this to change the panelist's role to an attendee.
Note: If you demote a panelist, it will remove their panelist join link from the web. If it is a recurring webinar, this also means that it will remove the panelist from all occurrences. If you promote them back to a panelist within the same webinar that they were demoted, then they are added back on the web. -
Rename: Change the panelist's name that is displayed to other participants.
Note: To change your own name that is displayed, hover over your name in the participants list and click Rename. This change only applies to the current webinar. To permanently change your name, see My Profile. -
Assign to Type Closed Captions: Assign the panelist to type Closed Caption during the webinar.
-
Allow to Record Local Files / Remove Permission to Record Local Files: Allow the panelist to start or stop a local recording of the webinar, or remove that given permission. Panelists do not have access to start a cloud recording.
-
Allow to Multi-pin: Allows this panelists to pin up to 9 videos within their view of the webinar
-
Put on hold: Place the panelist on hold. This will temporarily remove them from the webinar so that they cannot hear you, see your screen share, or your video, as well cannot be heard, seen, or share content. Their webinar screen will change to the message: "Please wait, the meeting host will let you in soon", followed by the name and date of the webinar.
-
Remove: Remove the panelist from the webinar. They will not be able to rejoin unless you allow participants and panelists to rejoin.
Changing a panelist to attendee
If you demote a panelist, it will remove their panelist join link from the web. If it is a recurring webinar, this also means that it will remove the panelist from all occurrences. If you promote them back to a panelist within the same webinar that they were demoted, then they are added back on the web.
- Sign in to the Zoom desktop client.
- Start a webinar as the host.
- Click Participants
 .
. - Click the Panelists tab.
- Hover over the name of the panelist you want to make an attendee and click on More.
- Click Change Role to Attendee.

How to manage attendees
On the Attendees tab, you will see the list of present attendees with any non-verbal feedback they have selected next to their name. When there are 7 or more attendees, the search bar will be available at the top of the list, allowing you to quickly search for a specific attendee.
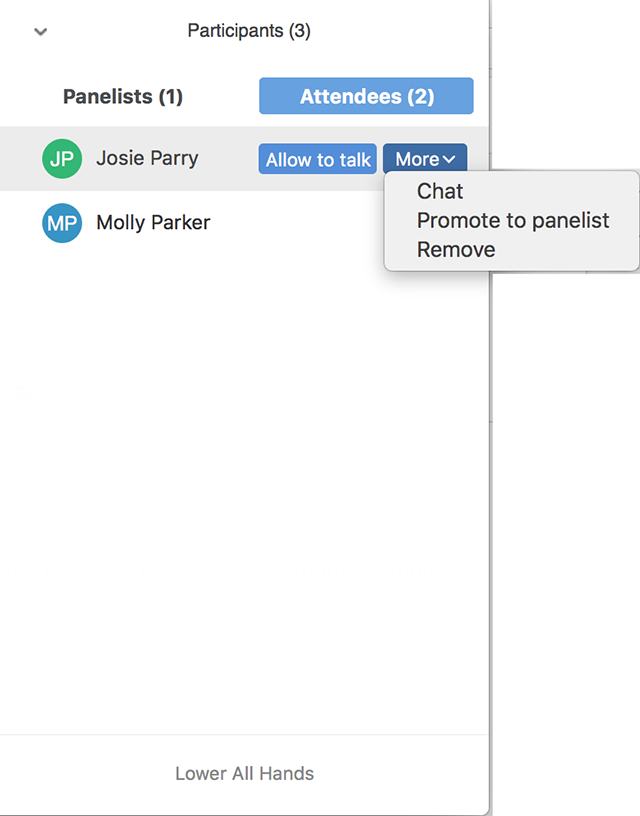
To manage attendees, hover over the attendee's name and click More. You will see the following options:

-
Allow to Talk: Allow the attendee to unmute and speak in the webinar. The participant will receive a prompt to confirm if they want to unmute or stay muted. If you already allowed a participant to talk but they decided to stay muted, click Ask to Unmute to prompt them to unmute their mic. All participants will be able to hear them.
Note: While unmuted, the attendee's profile picture and name is displayed to the host and panelists. Only their name is displayed to other attendees.
If you allowed the attendee to talk, you will see these options:
-
Mute / Ask to Unmute: Mute or unmute the attendee. They need to accept the unmute prompt before they are unmuted.
-
Disable talking: Revoke the attendee's ability to talk. This will mute the participant and prevent them from unmuting themselves.
-
Lower Hand: Lower the participant's hand. Their position in the participants will move down after the participants with their hand raised.
-
Chat: Open the chat window to send messages directly to the attendee.
-
Promote to panelist: Make the attendee a panelist.
-
Rename: Change the attendee's name that is displayed to other attendees.
-
Remove: Remove the attendee from the webinar. Remove the panelist from the webinar. They will not be able to rejoin unless you allow the attendee to rejoin.
At the bottom of the list of attendees, you will see the Lower All Hands option, which will lower all raised hands. This does not mute attendees that raised their hand and were unmuted.
Promoting an attendee to panelist
- Sign in to the Zoom desktop client.
- Start a webinar as the host.
- Click Participants
 .
. - Click the Attendees tab.

- Hover over the name of the attendee you want to promote and click More.
- Click Promote to panelist.

Additional controls
There are some additional controls at the bottom of the Participants panel in the Panelists tab:
-
Invite: Invite others to join your meeting.
-
Mute All: Mute all of the panelists and any attendees who you have given permission to talk.
-
More:
-
Ask All to Unmute: Unmute all panelists and any attendees who you have given permission to talk. The attendees without permission to talk will remain muted.
-
Lower All Hands: Lowers all raised hands of panelists. This has no effect on attendees' raised hands.
-
Mute Panelists On Entry: Mute all new panelists upon entry, but they will be able to unmute themselves. Attendees are automatically muted (and will not be able to unmute unless you promote them to panelists or allow them to talk).
-
Play Join and Leave Sound Play a chime whenever a new panelist or attendee joins or leaves the webinar.
-
Lock Webinar: Prevent any new panelists or attendees from joining the webinar, until you unlock it.
-
Allow Panelist to
-
Unmute Themselves: Allow panelists to unmute themselves as they see fit.
-
Rename: Allow panelists to rename themselves in the webinar
-
Start Video: Allow panelists to start their video if they would like to. If you uncheck this option, it will not stop the video feed of any panelist who already has their video on.
-
Allow attendees to:
-
Raise Hand: Allow attendees to raise their hand in the webinar. This feature is typically used if you want to know who would like to ask questions out loud.
-
View Participant Count: Allow attendees to see how many panelists and attendees are in the webinar. The number of panelists includes the host. It will appear at the top of their screen, after the meeting ID.


