Adding existing users to a paid account
Purchasing a Zoom account gives your organization access to more features and potentially licenses for your users. If you have not invited them to join your account already, some users in your organization may be utilizing Zoom with individual user accounts. If you want these users to have the benefits of your account, you will need to invite them to your organization's parent account. Individual users with paid accounts will receive a refund for the remaining time on their subscription if they accept your invitation.
This article covers:
Prerequisites for adding users to a paid account
- Admin or Owner access
- Paid account
How to add users on the web
- Sign in to your Zoom account.
- Click User Management then click Users.

- Click Add Users.

- Input the details for the user or users and click Add. An email will be sent inviting the user(s) to join your account. You can check to see if the invitation is still waiting to be accepted by clicking on the Pending section of the User Management page.
Note: The email addresses must be already exist and be able to receive external emails.

- Consult this article for more detailed information about adding users.
Best practices when inviting users
- An attachment has been included at the bottom of this page if you would like a quick start guide for this process.
- Zoom strongly encourages owners/admins to reach out to individual users before invites are sent, so these users know what to expect and why they are receiving an email.
- If you are inviting individual Licensed users to join your paid account as Basic users, be aware that if they accept the invite, these users will lose access to features available to Licensed users, such as recording to the cloud and meetings lasting longer than 40-minutes. Basic users can be assigned licenses later if necessary.
- It is also possible to add users with Single Sign-On and Associated Domains.
- If an invited user's prorated credit is being transferred your account, you will receive an email confirmation of the credit amount. If your account is on autopay, this credit will automatically be applied to future invoices. If your account has Net terms, you can reach out to Billing by chat to apply that credit to an open invoice.
How users accept an invitation
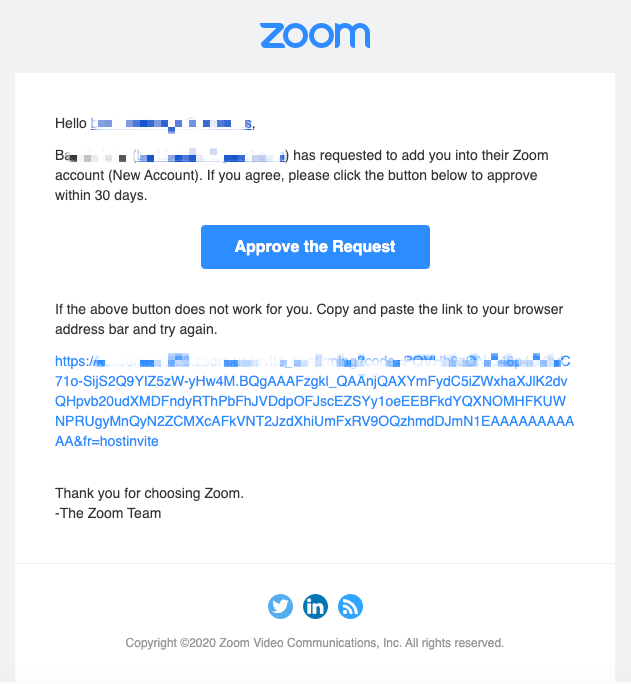
- Each user that is invited to your account will receive an email similar to this:

- The user will click the hyperlink or paste it into a browser to accept the invitation.
-
If the user is the owner of a paid account, they will be able to select if they would like to receive the prorated refund for their current subscription back to their own payment method or transfer the prorated credit balance to the new account they are joining.
Note: Your Account Balance shows how much is currently owed on your account, not your prorated credit/refund amount. You will not be able to join another account if you have any outstanding invoices.

- After the above steps are complete, the user can sign in like before by navigating to zoom.us. This user is now a member of your organization's account.
Notes:
- If you select to receive the refund back to your payment method, the refund should settle within 3-5 business days on your original payment method.
-
If the owner of an account is invited to join an account, the owner and all users on the account will join the account, including any users that outside the managed domain the account may have. If these external users are unwanted in the new account, they should be unlinked or deleted before accepting the invite on behalf of the entire account.
- Owners cannot accept an invitation if there are still Zoom Rooms on the account, which must be deleted on the Zoom Rooms page before the owner can accept the invite.
- If you have previously requested a cancellation on your account prior to attempting to accept an invitation to a new account, you will be notified that you need to remove that cancellation request first. On on your Billing page, click Reactivate Plan. Once reactivated, you can successfully accept the invitation to the new account, and by doing so, this ensures that you will be issued a prorated credit/refund for the unused portion of your plan.
- After accepting the invite and joining the account, the following details will transfer with you:
- Your profile details (name, profile picture, time zone, etc)
- Scheduled meetings and webinars
- Cloud recordings
- IM history
- Contacts
- Settings
Settings may be altered if they conflict with group or account settings on the account you are joining. Any licenses, such as large meeting or webinar, will not transfer, so these will need to be assigned by an admin on the new account. Reporting data will also not be transferred, so it is recommended they access and download any needed reports before accepting the account invitation. While IM history is transferred with and accessible to the user, any IM history from before joining the account is not accessible to account admins on the new account.
- When joining an account with a different Vanity URL, your meeting and webinar IDs will be unaffected, but the join links will be updated to the new Vanity URL. This will cause attendees joining with the old vanity links to be warned that the meeting they are joining is no longer associated with the account of the old vanity url and potentially cause confusion. To avoid this, you can email any guests and update calendar events with the updated join URL, or resend registration confirmation emails.


